Bias facings (also called bias strips/bias binding application), are a great way to finish off a raw edge of a garment, especially when there is no garment lining. This technique uses a 1'' strip, although many home sewers prefer using a pre-folded bias strip. Try both ways to ultimately decide your preference (this one is mine).
Prepare bias strips (your Sun Day Tank Pattern will have sufficient cut lengths for bias strips for armholes, crew necks, and v-necks. For a tutorial on cutting your bias strips, visit: Making Your Own Bias Strips .

Make sure shoulder seams are pressed towards back.

Make sure side seams are also pressed towards back.

Start applying bias strip on right side of garment (right sides together of bias strip and bodice if your bias strip has a print/face).
Starting at back of armhole, stitch to bodice at 1/4'' seam allowance. Leave about a 2-3'' tail to allow room to connect strips closing loop (you will see in next steps to visualize).

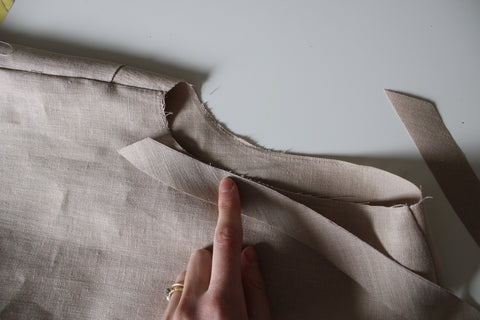
As you reach where you started stop about 2'' from start of stitch line (leaving about a 2-3'' tail at end.

At this point it should look like this:

Overlap bias strips (trim if you need to to allow strips to lay flush).

Mark a line where strips overlap.


Mark a line adding 1/4'' seam allowance.


Trim on seam allowance line.

Overlap strip ends (you will need to pinch them together and turn garment on its side). Stitch 1/4'' seam allowance.

Raw edges should face up:

Trim down seam allowance, and pin to armhole in preparation to connect stitch lines finishing attaching the strip to the armhole.

Connect stitch lines:

Your loop should now be closed:

Clip into seam allowance to help curve lay flat once folded and stitched.

Finger press bias strip (and seam allowance) up as depicted below:

Understitch bias strip to seam allowance (1/8'' from edge of seam).

Understitch will look like this once finished:

Press raw edge in towards garment, matching with stitch lines.

Press with iron around entire circumference of armhole (or crew neck).

Fold in one more time so that bias strip is on inside of garment.

Top stitch edge of bias strip connecting bias facing to inside of garment. You should now have one visible stitch on the outside of the garment, and two visible stitches on the inside of the garment.

Press armhole as needed.

You now have a bias facing. You can use this process on so many future garments!

