
DESIGN
The Sun Day Hat was designed to offer a casual sun hat for sitting on a sunny patio or garden on a hot summer day. This hat is a little loose to offer a bit of shade but still feel breathable, comfortable, and casual. Size down or consider adding a draw string/elastic tightening feature for a breezy beach day hat. This hat is offered in sizes XS-XL. Size chart is included with purchase of PDF pattern.
SEAM ALLOWANCE
All seams on Sun Day Hat Pattern are 1/4'' seam allowance (0.5cm).
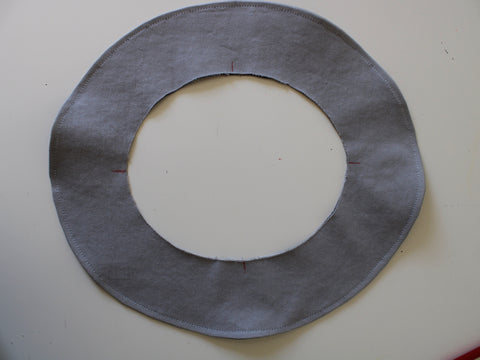
ASSEMBLE AND CUT OUT PATTERN PIECES
Cut out pattern pieces making sure to match notches. You should have TWO brim hat pieces, ONE top hat piece, ONE side-hat (front) piece, and TWO side-hat (back) pieces, and ONE bias strip piece (okay to assemble shorter pieces to complete strip length required as I did in this tutorial). **NOTE that the top hat piece is the same size as the inside of the brim!**
*If you are using a thin material such as a light weight linen or quilting cotton, you will want to double up layers of top hat, side hat pieces and interface one layer of hat brim, and one layer of top hat.

ASSEMBLING SIDE HAT PIECES
You should have ONE side hat (front panel), and TWO side hat (back) panels. Make sure you mark center back seams with three notches to differentiate.
With right sides together, attach front panel to side panels as depicted below (1/4'' seam allowance). Then stitch center back seam allowance at 1/4'' seam allowance (right sides together).

Side hat piece, make sure all raw edges are on inside.

Finish raw edges of side hat seams with a zig-zag stitch, or finishing with twill tape.

Press twill tape in half with iron, sandwich around seam and stitch along edge. It is completely fine if you miss the edge underneath, just make sure you stitch on the side of twill tape that will face up when you press seam towards front of hat ( underside will be hidden underneath seam after a final top stitch ... see next steps to fully see visual).

Press seam allowance/twill tape towards front of hat.

(Pressed towards front of hat):

With right side facing up, top stitch 1/4'' from seam.

This top stitch will stitch down twill tape to secure in place and also provide detail as well as structure to your hat.

Do this for all three seams on side hat:

CONNECTING SIDE HAT TO TOP HAT PIECE
Find quarter points of side hat. Place pin at center front and center back.

Match center front to center back, then place pins at quarter points.

Pin top hat center front to side hat center front (right sides together).

Continue pinning right sides together, side points, and center back points.

Pin more pins as needed easing in curves.

Stitch 1/4'' seam allowance connecting top hat to side hat.

Finish raw edge of top hat seam with zig-zag stitch, serge, or twill tape. If using twill tape make sure to stitch on top side (side with top hat piece facing up).

Fold twill tape in half, and stitch onto seam allowance (start at center back).

When you get to center back completing circle, fold under raw edge of twill tape and finish stitching onto seam allowance). Make sure to back-tack.

Press seam allowance down towards side hat panels.

With right side facing up, top stitch 1/4'' from seam, connecting seam allowance to side hat. This will provide detail and structure to your hat.

Top hat is now complete (put aside until you attach brim to top hat).

ASSEMBLING HAT BRIM
With right sides together pin center front, center back, and side notches together, and then pin as needed. (If you interfaced one piece, make sure interfacing is on outside on this step, so that when you turn this inside out after stitching, it will be hidden on inside of brim).

Stitch around perimeter of hat brim at 1/4'' seam allowance. (I reduce my stitch length to about 1.5-2 since I will be clipping into this seam in next step).

Since we will be turning this curved edge inside out, you will want to clip triangles out of the seam allowance about every half inch. Make sure you do not clip through stitch line. This eliminates bulk from the seam allowance when the curve is flipped to the inside reversing the curve from convex to concave, while also taking tension off of the stitch line to help help allow the curved stitch line lay smooth. *If you accidentally clip into the stitch line, just go back to your machine and stitch another stitch line just beyond clip.

You should now have many clipped triangles.

Turn brim right side out, make sure you didn't clip into stitch line by running your fingers along seam.

Finger press seam to edge, and press with iron so that brim lays flat and inner brim edges (inner circle) also match up.

Beginning at center back, top stitch 1/4'' from edge of hat brim.

Mark center front, center back, and side notches of hat brim on inner circle where brim will attach to side hat pieces.
ATTACHING TOP HAT TO BRIM
Make sure your top hat is quartered off as depicted below. (Place pins at back and center front, then match CF to CB pins to find quarter points).

Matching CF to CB pins to find quarter points depicted below.

With right sides together, pin center back seam of side hat to center back of brim.

With right sides together, pin center front and side seams (you will need to insert brim into top hat).

Just make sure your raw edges are all on the outside (same concept as right sides together).

Pin more as needed easing in curves.

Stitch together with 1/4'' seam allowance starting at center back. If you have a garment tag you like to use in your garments, this is a great step to insert your personalized tag, just make sure it is sticking out towards the right direction so it is visible on the outside of your hat).

BIAS TAPE APPLICATION
The bias tape is used to smooth over this raw edge that would be likely to irritate your head if left unfinished or simply zig-zag/serged.

Cut out bias tape with bias tape pattern piece provided with pattern. Connect two strips to make a closed loop.

Connect ends of bias strip as depicted below (stitch 1/4'' seam allowance). Make sure right sides are placed together.

You now have a fully closed loop that is a bit smaller than your hat circumference (you will stretch it out a bit to apply to hat).


Fold down one edge of bias tape, top stitching in place as I did is optional since it is cut on bias and should not fray.

Find half points of bias tape.

Pin half points to center back and center front to hat as depicted below. Pin as needed. If you need to stretch out tape a bit to fit that is ok! If you need to remove any length in bias tape as different textiles have quite different bias tape stretch properties (this was based off of a 9 oz cotton twill that does not stretch nearly as much as something like a light weight linen).

Stitch bias tape to hat 1/4'' seam allowance, beginning at center back.

Press up bias tape as depicted below.

With right side facing out, top stitch 1/4'' from seam securing bias tape up towards side hat pieces.

You have now completed your Sun Day Hat!